Tapbuy SDK for Android, version 1.0.0-beta1

Tapbuy SDK for Android is the easiest way to use Tapbuy on your Android app : Sell your products through the Tapbuy express checkout solution.
Conditions: Android Studio and Android min sdk 15 (4.0.3) or later.
Installation 
1. Create a Tapbuy app
If your app is not yet registered to Tapbuy and has an app ID, you have to create it. You can share an app ID between several platforms.
Connect on the Tapbuy backend and access to the Home > Apps section.
Simply click on Add an app and give it a name to create a new app ID.
2. Android Studio Setup
To use Tapbuy SDK in our project, add it as a build dependency and import it.
- Open your main project
build.gradlefile (project:myProjetName) and addjcenter ()in deposits supported if not already done.
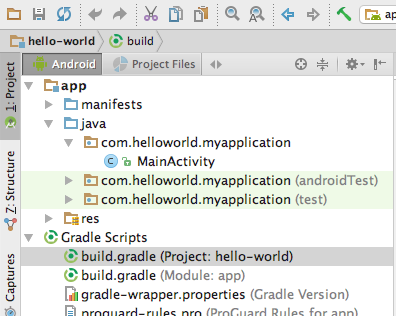
allprojects {
    repositories {
        jcenter()
    }
}- Open your main app module
build.gradlefile (Module:app).
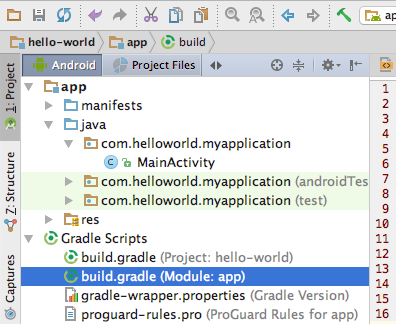
- Your App
minSdkVersionmust be at least API 15 : Android 4.0.3 or greater
defaultConfig {
   minSdkVersion 15
}- Add the compile dependency with the latest version of the Tapbuy SDK in the
build.gradlefile.
Alternatively you can download the latest Tapbuy
android sdk .aar module and import it manually in Android Studio > file
> New Module > Import .JAR/.AAR Package.
dependencies {
   compile ‘com.tapbuy.sdk:tapbuy-android-sdk:1.0.0’
}-
Open your strings.xml file. Example path:
/app/src/main/res/values/strings.xml. -
Add a new string with the name
com_tapbuy_sdk_app_idand value as your Tapbuy App ID
<string name="com_tapbuy_sdk_app_id" translatable="false">1234</string>- Add another string with the name
com_tapbuy_sdk_redirect_schemeand append your app id to the end of thetapbuyvalue. For example if your Tapbuy app id is 1234, the declaration looks like :
<string name="com_tapbuy_sdk_redirect_scheme" translatable="false">tapbuy1234</string>-
Open your project
AndroidManifest.xml -
Add a
uses-permissionelement to the manifest :
<uses-permission android:name="android.permission.INTERNET"/>- Add a
meta-dataelement to theapplicationelement :
<application android:label="@string/app_name" ...>
    ...
        <meta-data
            android:name="com.tapbuy.sdk.ApplicationId"
            android:value="@string/com_tapbuy_sdk_app_id" />
    ...
</application>
3. Using the SDK with ProGuard
You don’t have to perform any additional steps to use ProGuard for the Tapbuy Android SDK. For instructions on Proguard, see Android Tools Project Site, Running ProGuard.
Usage 
1. Tapbuy SDK Initialization
- The Tapbuy SDK should be initialized as early as possible. You should subclass
Applicationand callTapbuySdk.sdkInitialize()method inonCreate.
public class SampleApplication extends Application {

  @Override
  public void onCreate() {
      super.onCreate();
      TapbuySdk.sdkInitialize(this);
  }

}- Remember to update the application name in the manifest
<application
    android:name=".SampleApplication" ...>
...
</application>
2. Get tapbuy product links
Connect on the Tapbuy backend and access to the Link builder section.
Paste a target product URL of your website, activate the SDK option and click on Generate
link.
Then you should obtain a Tapbuy direct link that you can use to launch the
Tapbuy checkout process on the selected product.
3. Start a new Tapbuy checkout process
- Get a new checkout
Intentfrom theTapbuySdkinstance :
String productUri = "https://shop-test.tapbuy.io/8";
Intent checkoutIntent = TapbuySdk.getCheckoutIntent(this, productUri);- Start a new android Activity :
startActivity(checkoutIntent);- that’s all!
4. Start a new custom Tapbuy checkout process
For a seamless user experience, and if you already know some details about your user, you can provide some of this information to fill the pre checkout form.
- Buid a new
CheckoutParamsobject (none of that fields are mandatory) :
final CheckoutParams params = CheckoutParams.builder()
        .userAddress("user address 01")
        .userAddress2("user Address 02")
        .userCity("Marly-Le-Roy")
        .userCountry("fr")
        .userEmail("user@test.fr")
        .userFirstname("User first name")
        .userLastname("User last name")
        .userPhone("023112345678").userZipcode("14000")
        .displayOptions(CheckoutParams.COMPLEMENTARY, CheckoutParams.SIMILAR)
        .skipProductView()
.build();- Get a new checkout
Intentfrom theTapbuySdkinstance with :
String productUri = "https://shop-test.tapbuy.io/8";
Intent checkoutIntent = TapbuySdk.getCheckoutIntent(this, productUri, params);- Start a new android
Activity:
startActivity(checkoutIntent);- That’s all!
Customize checkout UI 
Change Tapbuy Toolbar backgroud color
You can customize the checkout activity Toolbar backgroud color.
-
Open or create
colors.xmlfile (path exemple :/app/src/main/res/values/colors.xml) -
Add a new color with the name
com_tapbuy_sdk_checkout_toolbar_colorand value as your custom color:
<color name="com_tapbuy_sdk_checkout_toolbar_color">#3F51B5</color>Help 
Changelog
Check the SDK repository Changelog file for changes and updates.
Testing and Debugging
Sandbox
In this mode, Tapbuy will be executed in sandbox mode. In this mode you can use your own product links. No payment or purchases will be effectively executed.
TapbuySDK.setModeSandbox(true);Debug
You can enable the Tapbuy test and debug mode :
TapbuySDK.setModeDebug(true);Technical reference
For a detailed SDK reference, you can check the Tapbuy Android SDK Javadoc.
Sample Application
A sample application (the source is in the repository) is available to check how the Tapbuy SDK can be implemented.
Bugs & feedback
For more details, bug feedback, or support contact us at support@tapbuy.io.
License
Copyright (c) 2016. Tapbuy

Licensed under the Apache License, Version 2.0 (the "License");
you may not use this file except in compliance with the License.
You may obtain a copy of the License at

   http://www.apache.org/licenses/LICENSE-2.0

Unless required by applicable law or agreed to in writing, software
distributed under the License is distributed on an "AS IS" BASIS,
WITHOUT WARRANTIES OR CONDITIONS OF ANY KIND, either express or implied.
See the License for the specific language governing permissions and
limitations under the License.